Grafting of fruit trees is a technological method that consists of transplanting a part of one plant onto another with the purpose of fusing them into a single organism.
There are about 200 methods of grafting fruit trees, and in this article, we will consider the most popular ones.
- Compatibility of Fruit Trees for Grafting
- Table of Fruit Tree Compatibility for Grafting
- Methods of Grafting Fruit Trees
- Budding (T-budding / Oculation)
- How to Perform T-Budding:
- Patch Budding (Flap Budding)
- Simple Whip Grafting
- Improved Whip Grafting
- Side-Veneer Grafting of Fruit Trees
- Cleft Grafting of Fruit Trees
- Grafting with Peripheral Half-Cleft
- Spring Bark Grafting of Fruit Trees
- Preparation of Cuttings for Spring and Summer Grafting
- Rules for Successful Grafting
Compatibility of Fruit Trees for Grafting
Before performing grafting, it is necessary to choose trees that can be combined with each other, as this is one of the main rules for successful fusion. Stone fruit species can only be grafted onto stone fruit rootstocks, and pome fruits — onto pome trees. One should not expect a pear to grow on a cherry. But a pear can be easily grafted onto a quince.
Only young trees no older than 15 years are used for grafting. The younger the tree, the better it accepts the graft. In addition, early-ripening varieties should not be grafted with late-ripening ones.
The graft is a shoot or bud from a cultivated tree that is grafted onto the rootstock for the purpose of variety propagation.The rootstock is a seedling or old tree that serves as the root system. It is most often a wild tree species or a specially selected tree with certain qualities (dwarf growth, disease resistance, strong root system, resilience to stressful growing conditions, etc.).
Table of Fruit Tree Compatibility for Grafting
| Graft (Scion) | Rootstock |
| Apple tree | Apple tree, Rowan, Chinese apple (Malus prunifolia), clonal rootstocks – A2, MM 106, 5-25-3, 54-118, M9, 62-396 |
| Pear | Apple tree, Pear, Rowan, Forest pear, Ussurian pear, Quince, Chokeberry, Hawthorn, Serviceberry |
| Sour cherry | Sweet cherry, Wild cherry, Mahaleb cherry, Czerepadus (hybrid of cherry and bird cherry) |
| Sweet cherry | Wild cherry, Mahaleb cherry |
| Peach | Cherry plum, Plum, Nanking cherry, Apricot, Blackthorn, Almond |
| Apricot | Apricot, Cherry plum, Wild plum, Zherdel (wild apricot), Blackthorn, Sand cherry and Nanking cherry |
| Plum | Cherry plum, Wild plum, Plum hybrid (ternosliva), Blackthorn, Nanking cherry, Apricot, rootstocks – SVG-11-19, VVA-1 |
| Cherry plum | Plum, Blackthorn |
| Grape | Actinidia |
Methods of Grafting Fruit Trees
Budding (T-budding / Oculation)
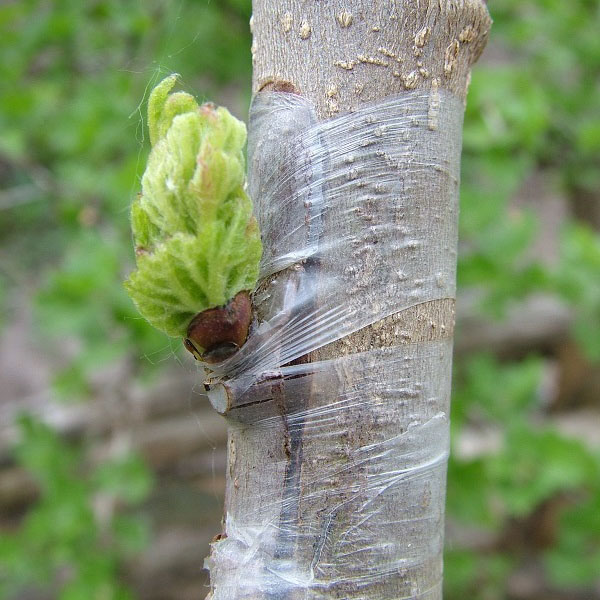
Budding is a method of grafting where a bud (eye) along with the adjacent tissue is attached to the rootstock. This method is the most popular in fruit growing because it does not require a large amount of grafting material, shows a high percentage of successful fusion, and is done quickly and easily. Budding can only be performed when the bark easily separates from the tree trunk. This occurs twice a year — in spring and in summer from the end of July.
In spring, budding is done with buds cut from the branches of last year’s tree growth. In summer, shields are grafted from the current year’s growth. The budding process begins with stone fruit species (plum, cherry, etc.), and then proceeds to pome species (pear, apple).
Summer budding should be started in the morning before the hot part of the day, and continued after noon until sunset. In cloudy weather, grafting is allowed throughout the day, but in rainy conditions, budding is prohibited.Before grafting fruit trees by budding, side shoots on the rootstock trunk are cut off at a height of 20–25 cm. Budding is done using a budding knife, which must be razor-sharp. For this reason, the knife is frequently wiped clean of dirt and debris with a cloth and sharpened with a strap.
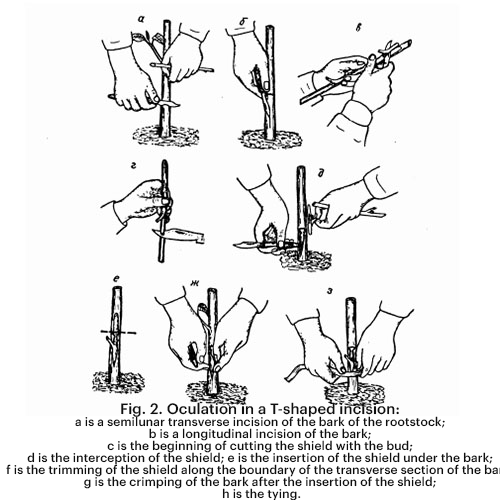
How to Perform T-Budding:
- For budding, choose a spot on the tree trunk with smooth, clean bark on the north side, at a height of 10–15 cm from the ground. If the rootstock is bent, the bud should be grafted below the bend; on slanted seedlings, buds are grafted on the upper side.
- To make a T-shaped cut, slightly tilt the tree backward, grip it slightly above the intended cut point, and make a horizontal cut into the bark. Its length should not exceed one-third of the trunk’s diameter.
- Then, from bottom to top, make a vertical cut in the bark 2.5–3 cm long. If the bark separates easily, a 1–1.5 cm cut will be enough. When the vertical cut meets the horizontal one, carefully lift the bark edges with the knife blade. If the bark does not separate well, it can be moved aside using the tip found at the bottom end of the knife.
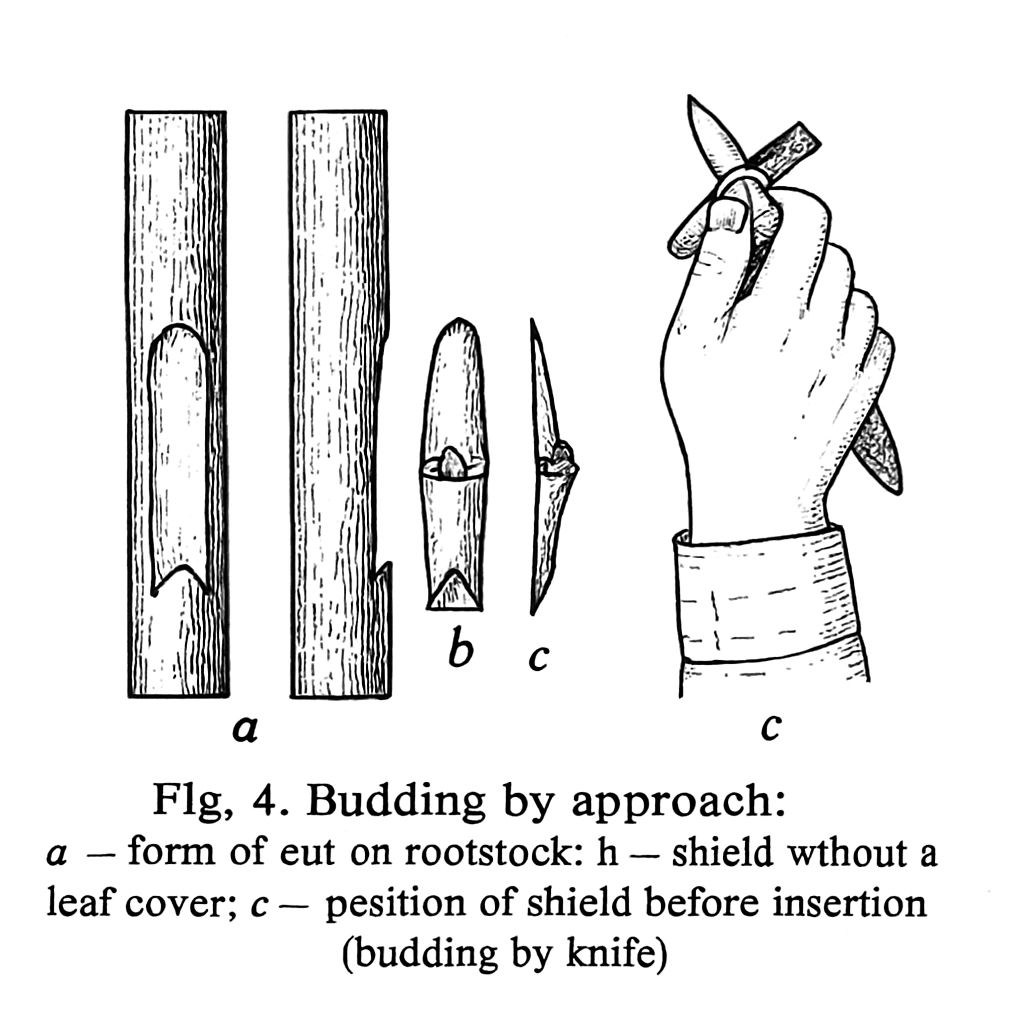
- When selecting the shield, note that for thick rootstocks, the bud is cut from the underside of the branch, and for thin ones — from the top. The bud is cut with a smooth motion toward oneself, with minimal contact with the wood. The cut should leave about 1.5 cm of bark above and below the bud. The total length of the shield should be 3–4 cm.
- Insert the shield with its lower end under the bark in the T-shaped cut on the rootstock, pushing it all the way in. The bud should be level with the bark edges. If not, shorten the bottom of the shield.
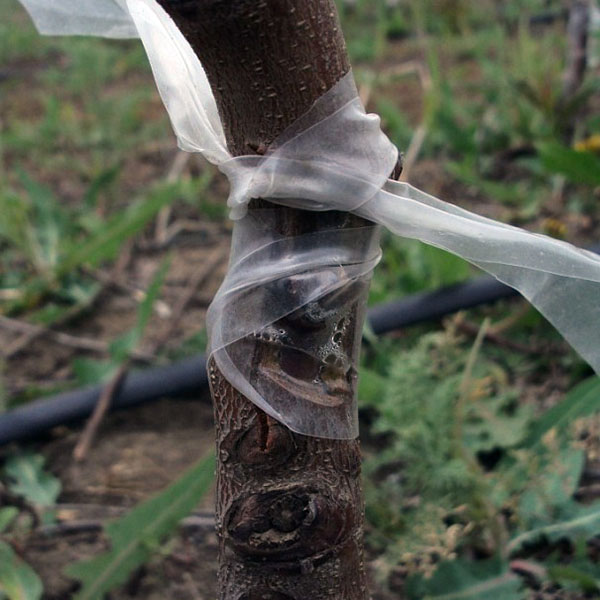
- Then press the bark over the shield and tie it with polyethylene tape, 8–12 mm wide, from bottom to top. The tape should tightly cover all parts, leaving the bud itself uncovered.
Patch Budding (Flap Budding)
This type of budding is suitable for grafting in summer or spring when the bark on the rootstock does not separate well. It is also appropriate for young seedlings with thin bark. The technique is similar to T-budding but has its own specifics.
Patch Budding Technique:
- A horizontal cut is made on the rootstock through the bark and into the wood at the point where the bottom of the bud shield will be. Then the knife is inserted 4–5 mm deep, at a height of 3–4 cm above the horizontal cut, and a strip of bark is cut downwards with minimal wood removal. As a result, a wedge-shaped cut should be formed.
- To shape the shield to fit the cut on the rootstock, place the knife at a 30° angle, 1.5–2 cm below the bud, and make a cut 7–8 mm long, removing some wood. Then remove the knife and repeat the same on the opposite side.
- After cutting, press the bud with your thumb against the knife blade and insert it firmly into the cut on the rootstock. If the shield falls to the ground, it must be replaced with a new one.
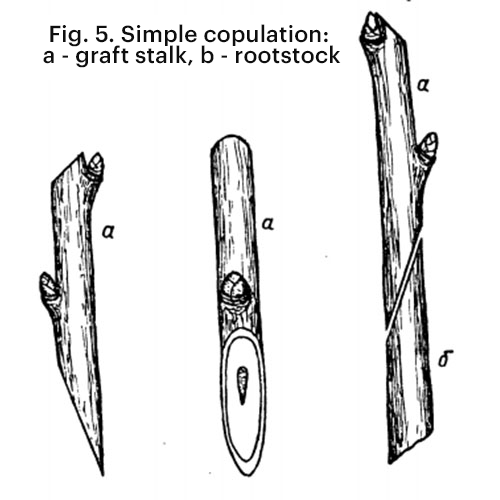
Simple Whip Grafting
Whip grafting is a winter grafting method for fruit trees, as it is not very convenient under field conditions. It is used for propagating fruit trees and cultivated plants when the scion and rootstock are of the same diameter.
Simple Whip Grafting Technique:
- Make a slanted cut on the rootstock, 4–5 cm long.
- Then cut the scion at the same angle, also 4–5 cm in length. The cutting is shortened, leaving 2–3 buds on it. The remaining part of the scion can be used for other grafts. Thin scions are cut with a grafting knife, while thick ones — with pruners.
- Then the rootstock and scion are joined by aligning the cuts so they match. The graft is tightly tied with polyethylene tape.
- The upper cut of the grafted scion and the grafting point are covered with garden pitch or dipped into melted paraffin.
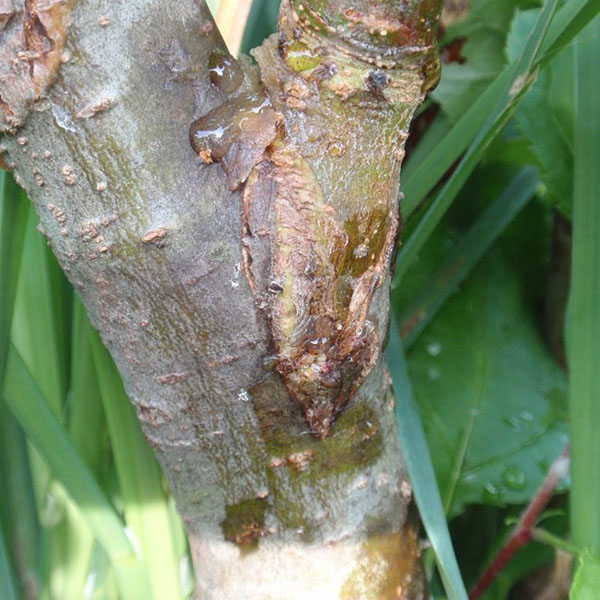
Improved Whip Grafting
Improved whip grafting is also called whip grafting with a tongue, which helps the scion hold more securely on the rootstock. This method is suitable for grafting apple, pear, plum, cherry plum, sweet cherry, sour cherry, and grape.
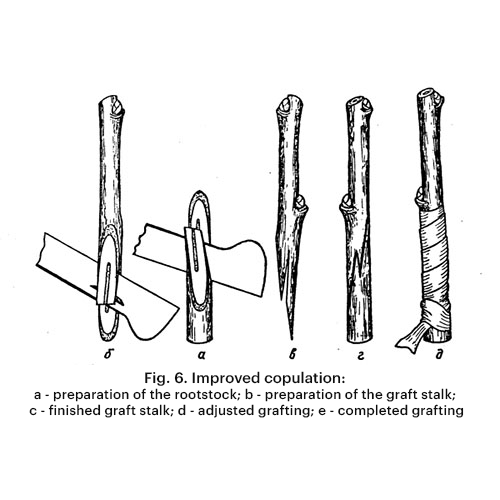
How to perform improved whip grafting:
- Preparation of the scion and rootstock is the same as in simple whip grafting. But here you also need to make a cut for the tongue, leaving 1/3 of the lower part of the cut (which corresponds to the pith exit), and make a longitudinal cut along 2/3 of the cut length.
- The tongue is made on the rootstock using the same technique.
- Then the scions are placed cut to cut so they fit tightly into the tongues.
- Next, the joint is wrapped with tape and covered with garden pitch or melted paraffin.
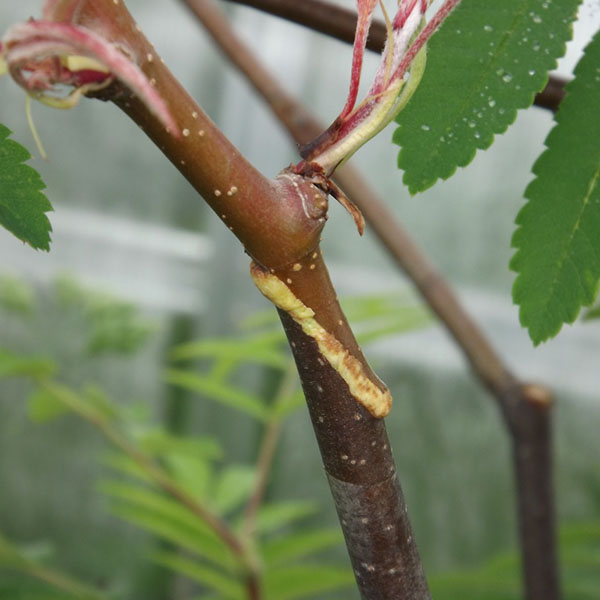
Side-Veneer Grafting of Fruit Trees
This is a spring grafting method used on branches or rootstocks with a diameter of 1.5–2.5 cm. Its advantage is a stronger attachment of the scion to the rootstock. This method is also widely used for regrafting onto rootstocks where shield buds failed to take after whip grafting. Grafting begins at the start of bud swelling.
Procedure for Side-Veneer Grafting:
- The rootstock is cut back 8–10 cm above the intended grafting site.
- Using a grafting knife, make a cut at a 15–20° angle to the surface of the rootstock. The cut should be 4–5 cm long and deep enough to allow the rootstock to be slightly bent.
- To prepare the rootstock, hold it in your left hand so that the lower bud is on top and slightly turned to the left. Begin the cut 2–3 mm below the bud and continue for 4–5 cm.
- Then, rotate the scion and make a cut on the opposite side, 5–8 mm below the bud, angling the knife at 15°. If the cuts are made at the same distance from the bud, after inserting the scion into the rootstock, the flap will slightly shift and not fit snugly.
- After preparing the scion, cut it above the second bud and insert it into the cut on the rootstock.
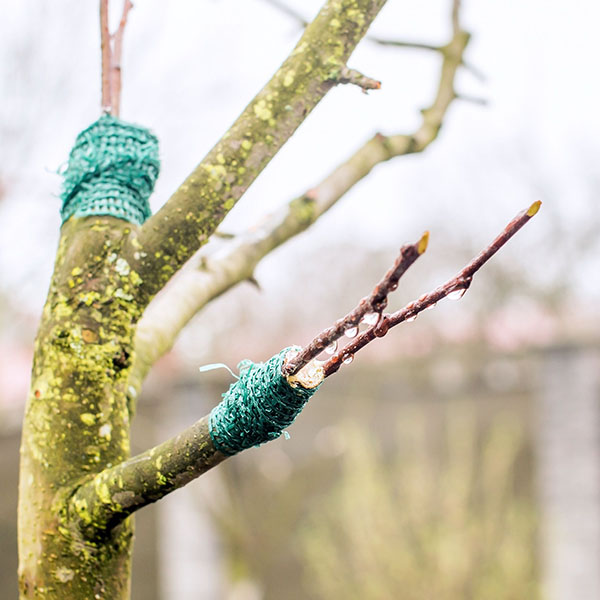
- The graft is tightly wrapped with plastic tape from top to bottom and coated with garden pitch.
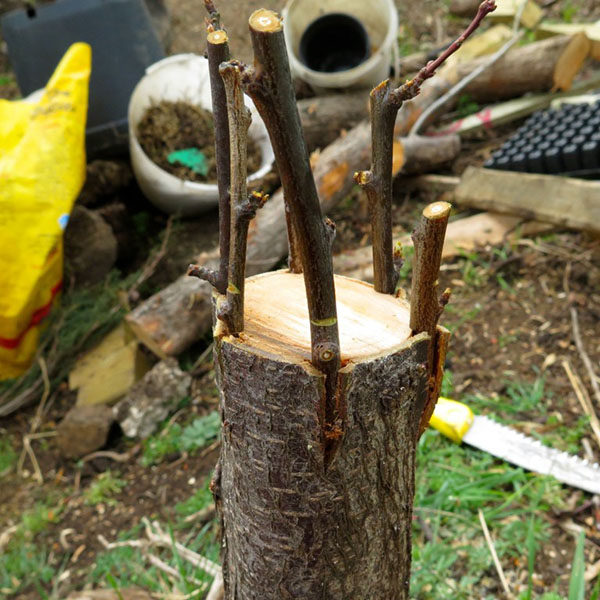
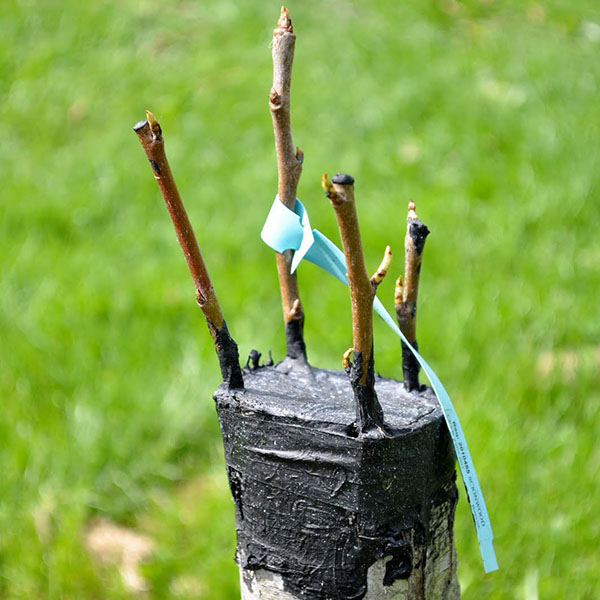
Cleft Grafting of Fruit Trees
This is a spring regrafting method used on branches with a diameter of 3–10 cm. Grafting can be done before sap flow, but it is best to wait until the beginning of bud swelling. Cleft grafting is recommended for apple, pear, cherry plum, plum, grape, and sweet cherry.
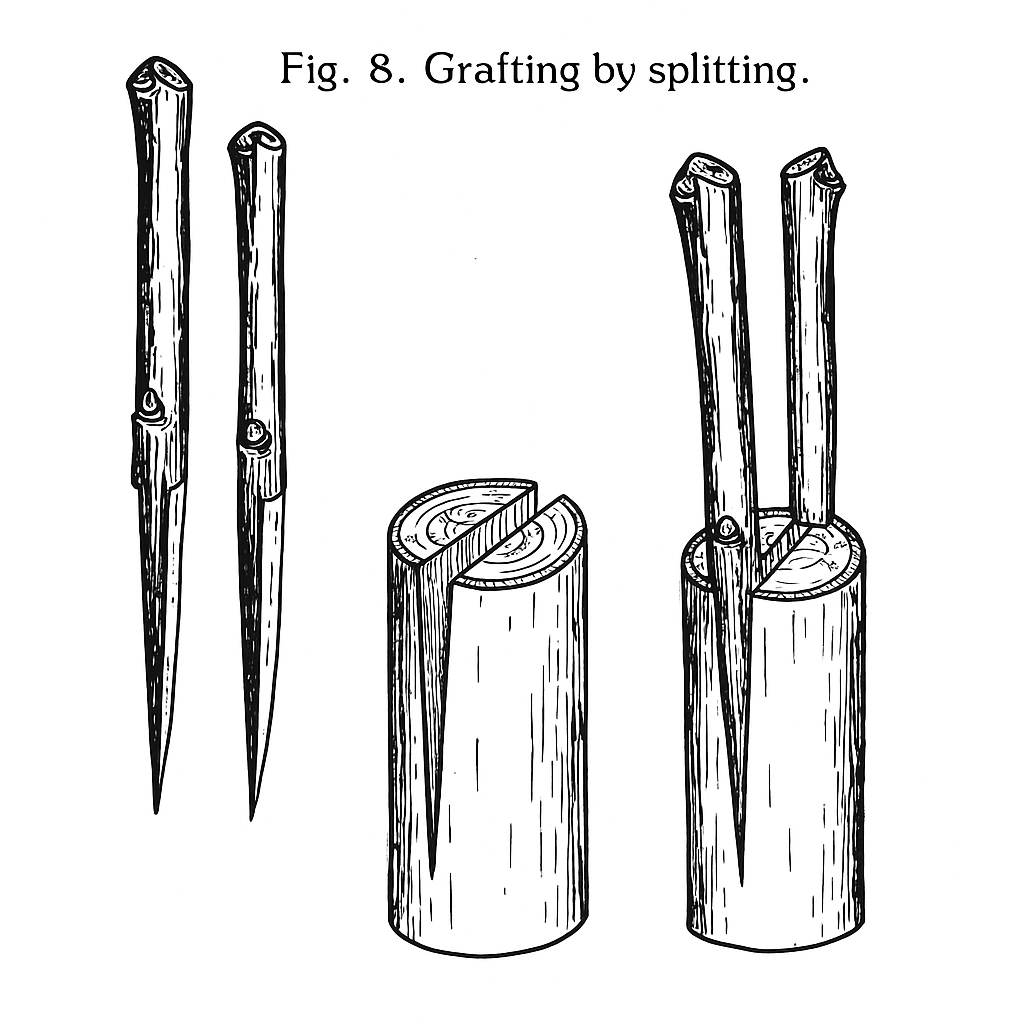
Procedure for Cleft Grafting:
- Use a large sharp knife for grafting. Make a cut on the branch at a spot where there are no branches within 10 cm below. After cutting, clean the cut surface with the knife.
- Make a cut down the middle to a depth of 5–8 cm by tapping the knife with a hammer. Then remove the knife and insert a screwdriver or wedge into the cut, widening the split by 4–5 mm.
- Cut scions in a wedge shape up to 5 cm long, leaving bark on both the inner and outer sides. The outer side should be slightly wider than the inner side.
- Insert 2 scions on opposite sides of the split. On large branches, insert 4 scions, making additional splits perpendicular to each other.
- After that, remove the wedge or screwdriver used to keep the split open and tie the graft firmly. Then cover the joint and the upper cuts of the scions with garden pitch.
- After 2–3 days, inspect the graft and cover any cracks with garden pitch.
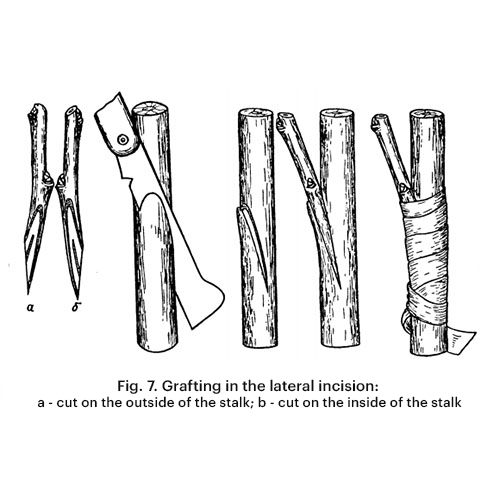
Grafting with Peripheral Half-Cleft
This method is used for regrafting rootstocks with a width of 1.5 cm or more and is distinguished by the fact that the cut is made with a grafting knife. The larger the diameter of the rootstock, the sharper the angle of the cut.
How to perform half-cleft grafting:
- At the intended grafting site, cut the rootstock with secateurs or a saw.
- According to the diameter of the rootstock, make 1–2 cuts with a knife.
- The cuts should allow the knife to penetrate 2–3 mm into the rootstock and make a notch 8–10 mm deep.
- The base of the scion is shaped into a wedge, similar to cleft grafting, but it should be more symmetrical.
- Then insert the scion into the rootstock cut, wrap it tightly, and cover with garden pitch.
Spring Bark Grafting of Fruit Trees
This is a simple method to graft fruit trees in spring with a high rate of survival. There are three techniques of this grafting, but all are performed by separating the bark during the period of active sap flow in spring.
The downside of this method is that the scions are not as firmly fixed as in cleft grafting and often break off from wind or heavy leaf growth. Therefore, they need to be securely tied and, during the first two years, provided with additional support for the grafted branches.
Tip! Stone fruit trees are best grafted from the end of March to early April, while pome fruit trees—from early April to mid-June.
Bark grafting allows regrafting branches with a thickness from 2 to 20 cm. However, the thicker the scion, the longer it takes to fuse and the higher the risk of breakage. This method is recommended for grafting apples, pears, and other pome fruit trees.
Bark Grafting Technique – Method 1:
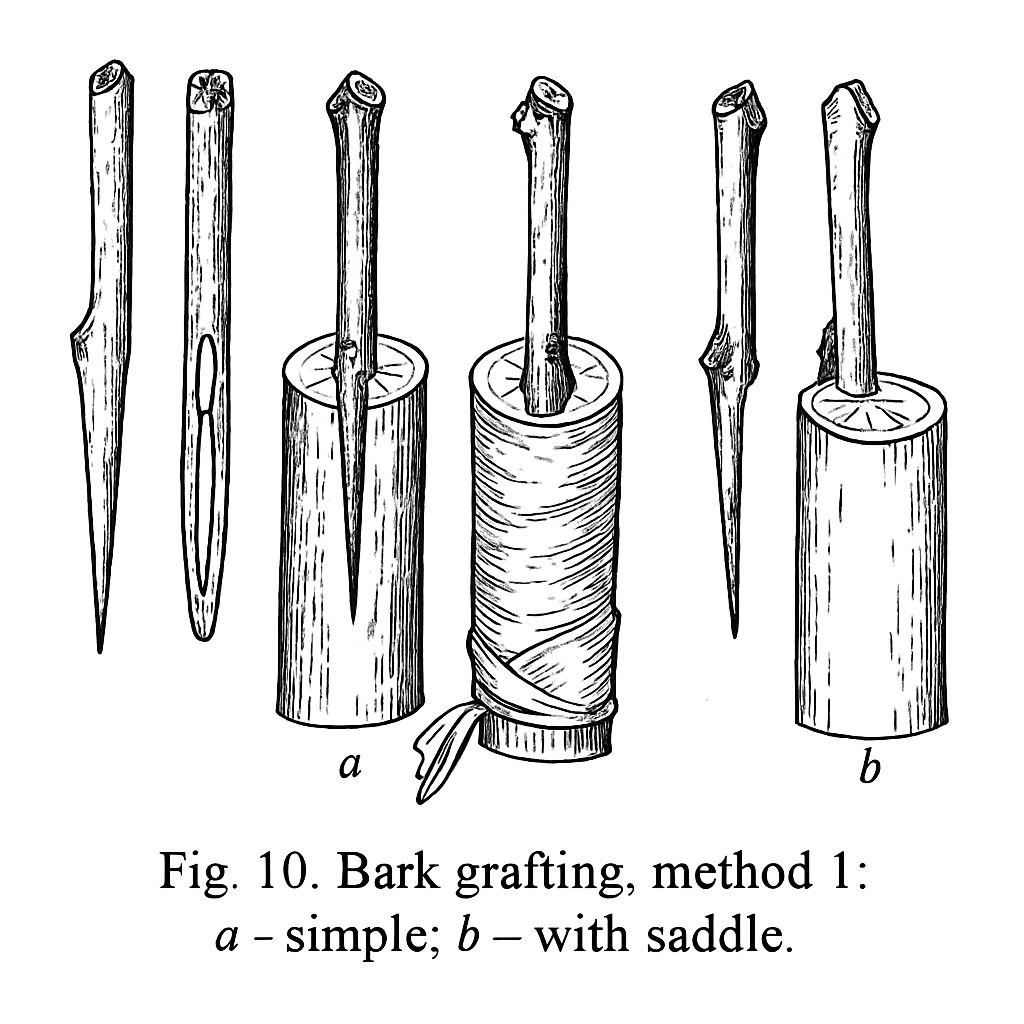
- Make a vertical cut through the bark down to the wood on the side of the rootstock about 5 cm long.
- Carefully lift the bark at the edges of the cut so you can insert the scion.
- On the lower part of the scion, make an angled cut similar to copulation grafting. For thick rootstocks, create a step about one-third the diameter of the scion at the top, then thin the scion.
- Insert the prepared scion under the bark, pushing it all the way to the bottom of the cut.
- Depending on the diameter of the rootstock, you can insert multiple scions, but they should be spaced at least 3 cm apart.
- Tie the graft firmly to secure it and cover the top of the scion and the cut end of the rootstock with garden wax.
Bark Grafting Technique – Method 2:
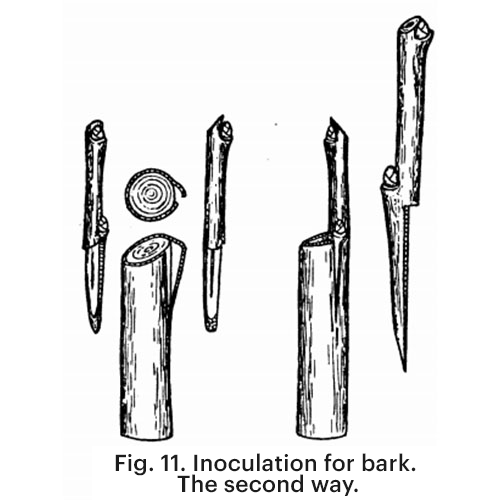
- Make the same cut on the rootstock as in method 1, but peel back the bark only on one side.
- Make an angled cut on the scion up to 5 cm long. To improve the scion’s survival, make a longitudinal slit that does not reach the wood. Then, on the outer side of the scion’s cut, make a short additional cut. Thick scions may have a small step, like in method 1.
- Then the scion is inserted under the bark, tightly wrapped with polyethylene film, and the cut areas are treated with garden wax.
Technique of Grafting by Bark Inlay:
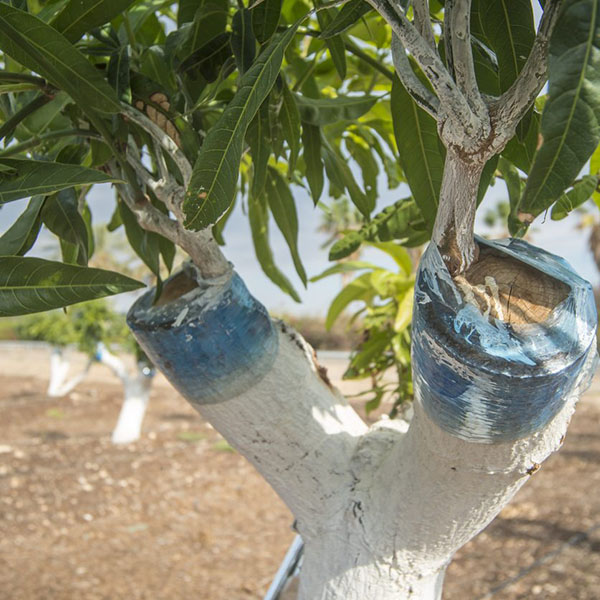

The advantage of this grafting method is the close contact between the rootstock and the scion, which ensures a high survival rate. It is also convenient for re-grafting onto a thick rootstock.
- First, the rootstock must be cut and the cut surface cleaned.
- The scion is prepared as in the previous methods, with or without a notch.
- On the rootstock, at a slight angle, two longitudinal cuts 4-5 cm long are made. First, one cut is made, then the scion is placed against its edge without touching the bark to measure where the second cut should be. This is done so that the strip of bark that is separated matches the size of the cut on the scion.
- After making the second cut, the scion is tightly inserted so that it rests with the notch downward. Then the strip of separated bark is trimmed, leaving a small protrusion at the bottom to cover the lower part of the scion.
- If necessary, several more cuts can be made and scions grafted onto them.6. Then the graft is tied up and the entire area is treated with garden wax.
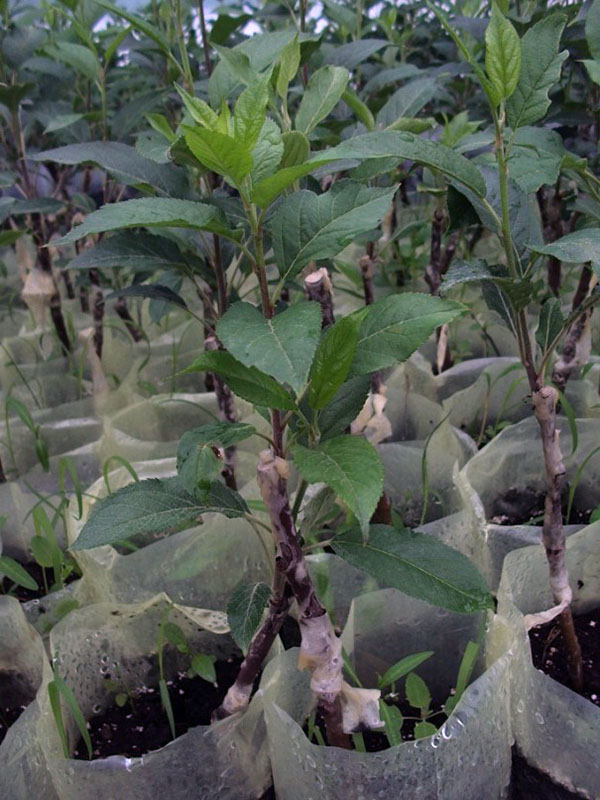
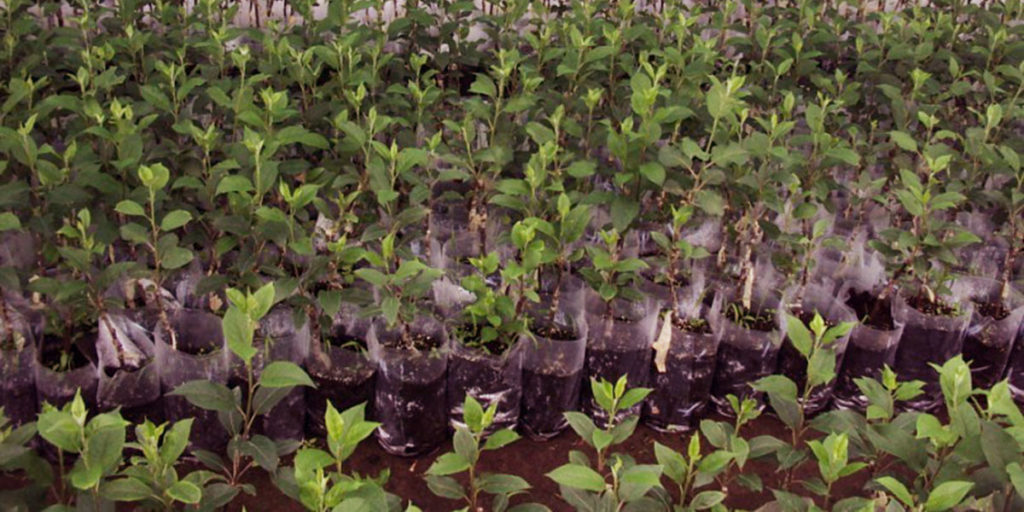
Preparation of Cuttings for Spring and Summer Grafting
For spring grafting, cuttings of cherry, sour cherry, plum, pear, and cherry plum are harvested in late autumn or early winter. This is done because the one-year growth of these trees can be damaged by winter frosts. Apple cuttings can be harvested throughout the winter, but less winter-hardy varieties should be cut before severe frosts, during the mass pruning of fruit trees.
Cuttings for grafting must be healthy, without signs of pest or disease damage, have at least 6 buds, be at least 40 cm long, and have a bottom cut thickness of at least 7 mm. Grafting material is harvested with a reserve of 2-3 cuttings per one rootstock.
Scions are tied into bundles, labeled if necessary, and stored in a storage place at a temperature of 0…+1°C and air humidity of 94-96%. Cuttings can also be stored under a thick layer of snow covered by a 20 cm layer of sawdust.
For summer budding, one-year branches with slight lignification and a crisp break when bent are cut. The shoot length should be at least 30 cm, and the diameter of the lower part 5-6 mm. Scions are cut with pruning shears in the morning on the day of grafting. When cutting on the tree, 3-4 buds should be left.
Branches are carried to the shade, where leaves are removed, leaving petioles up to 1 cm long. Cuttings are delivered to the budding site in a damp sackcloth. Healthy buds located in the middle of the cutting are used for grafting. During grafting, unused cuttings are stored in a bucket with 3-5 cm of water, covered with a damp cloth.
Rules for Successful Grafting
- Several varieties and even species can be grafted onto one rootstock, but with maximum compatibility.
- Each type of grafting is performed within its own timeframe.
- Special tools for grafting fruit trees are used for all work — a budding knife, a grafting knife, and auxiliary tools.
- Knives must be clean and razor-sharp. After sharpening, they are polished using a leather strap.
- All crosscuts made by a saw or pruning shears must be cleaned with a sharp knife.
- All cuts on rootstocks and scions are made in one motion toward yourself, except in special cases.
- Do not touch the cut areas with your hands, as this reduces the survival rate of the cuttings.
- No more than 2-3 minutes should pass between the cut and the joining of the scion and rootstock, especially during summer grafting.
- Also, coating with garden wax or dipping in melted paraffin must be done immediately after tying the graft. This protects the trees from the penetration of various pathogens into the cuts.
- When preparing the tree for grafting, branches are first cut at a height of 40-50 cm above the grafting sites. The grafting site itself is cleaned immediately before joining with the scion.
- Trees should be grafted from top to bottom to avoid the risk of breaking the grafts.
Grafting trees allows you to grow strong varietal trees, as well as renew old varieties and get a high yield of fruits from them.
Grafted branches will start to bear fruit in 2-3 years, and don’t be discouraged if it doesn’t work the first time. Experiment, and you will be able to find the best method for growing productive fruit trees.
Any questions on this topic? Write them in the comments, and we will help you get answers!
If you have found a spelling error, please, notify us by selecting that text and pressing Ctrl+Enter.