Microgreens are young plant shoots that grow for no more than 14 days. They are currently becoming very trendy because of their wide variety of types, great health benefits, and ease of cultivation. Microgreens are especially relevant in winter when fresh vegetables in stores are significantly more expensive and do not match the flavor qualities we are accustomed to in season.
In this article, we will discuss the advantages of growing microgreens, the most common methods, and the conditions for abundant microgreen growth.
- Why You Should Start Growing Microgreens
- Methods of Growing Microgreens
- Growing Microgreens in a Container or Mini Greenhouse
- What you need:
- Step-by-step growing process:
- Growing Microgreens in a Glass Jar
- What elements do you need:
- Step-by-step growing process:
- Growing Microgreens Without Soil Using a Sprouter
- What you need to grow microgreens in a sprouter:
- Step-by-step instructions:
- Conditions for Growing Microgreens
- Table: Soaking, Sprouting, and Growing Times for Microgreens
Why You Should Start Growing Microgreens
- Microgreens can be easily grown not only by professionals in industrial conditions but also by anyone at home.
- Microgreens can be sown and harvested year-round.
- Simple growing technology. It does not require special effort or significant financial costs.
- Mini sprouts do not need much space to grow.
- Short growing period (from 5 to 14 days).
- Growing microgreens does not require fertilizers, and due to the short growing period, mini-plants are not affected by pest infestations or diseases. Therefore, it is an environmentally clean product.
- A wide variety of plants are suitable for this growing method. Everyone can choose the culture that they like and that will not harm their health.
- Great health benefits. Regular consumption of microgreens can normalize cardiovascular and digestive system functions, help cleanse the body of toxins, reduce weight, and improve the condition of hair, skin, and nails.
- Microgreens can be added to all dishes. They will give ordinary recipes an attractive appearance and improve their taste.
Methods of Growing Microgreens
There are various methods for sowing microgreens. Their growing technology does not require special effort. We have selected the most optimal methods that will help you quickly and easily get fresh, aromatic sprouts at home.
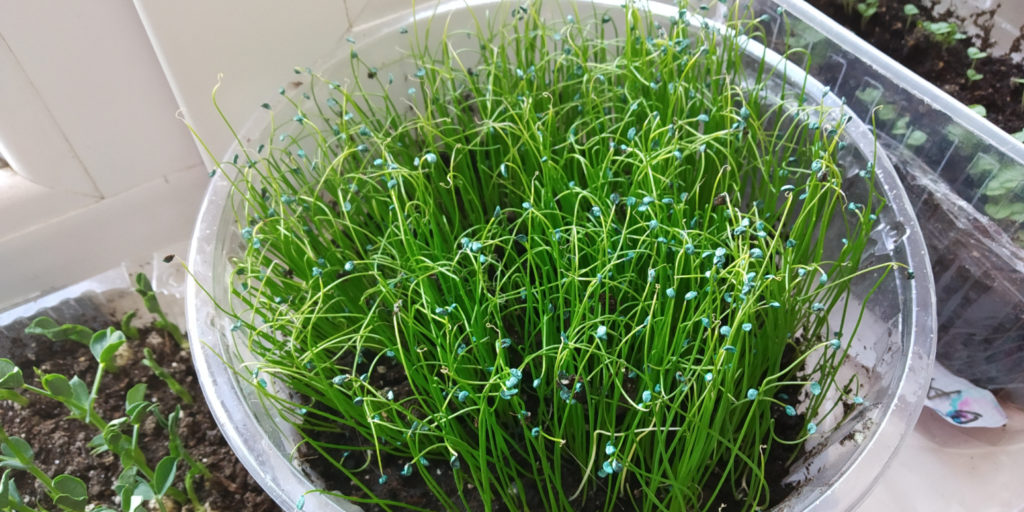
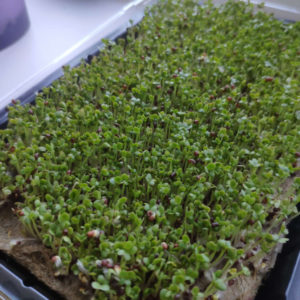
Growing Microgreens in a Container or Mini Greenhouse
This is the most common method for growing microgreens, which can be easily done by any home gardener. It’s suitable for all types of microgreen crops.
What you need:
- Organic microgreen seeds that have not been treated with pesticides
- Growing containers (disposable or reusable containers with lids, mini-greenhouses)
- Growing substrate (linen mat, medical cotton with gauze, coconut substrate, light peat, etc.)
- Hand spray bottle for watering
Step-by-step growing process:
- Before sowing, soak the seeds at room temperature for 2–12 hours depending on the crop.
- Place the chosen substrate evenly on the bottom of the container. Spread the seeds evenly on top. If using peat, do not bury the seeds deeply, just lightly cover them.
- Thoroughly mist the seeds with water using the spray bottle.
- Cover the container with a lid and move it to a warm place. For better results, cover the mini-greenhouse with a cloth or place it in a dark spot.
- During germination, seeds need to be ventilated and misted 1–2 times per day. Be careful not to overwater or deprive seeds of air, as this may cause mold.
- Once seeds begin to sprout, remove the lid and place the container in a bright spot like a windowsill or balcony. Avoid direct sunlight, which can dry out the tiny plants.
- Water the microgreens moderately 1–2 times per day as the substrate dries out.
- Microgreens will be ready to harvest in 5–14 days depending on the variety.
- Harvest the microgreens by cutting them with scissors.
- Store harvested microgreens in the refrigerator in a container or wrapped in a paper towel for up to 5 days.
Growing Microgreens in a Glass Jar
This is an unusual method best suited for large-seeded crops like peas or sunflower. The most challenging part of this technique is regularly rinsing the seeds until they sprout.
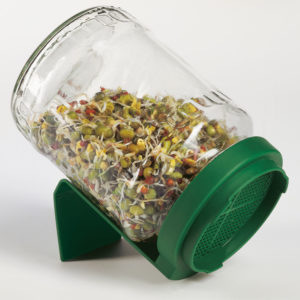
What elements do you need:
- Microgreen seeds that have not been treated with pesticides
- A glass jar of 0.5 or 1 liter capacity
- A lid with a mesh, cheesecloth, or another mesh material, and a rubber band to secure it
- A tray for the jar
Step-by-step growing process:
- Soak the seeds in the jar with warm water for 24 hours.
- Cover the jar with a mesh lid or cheesecloth, secure it with a rubber band.
- Drain the water from the jar without removing the mesh cover.
- Turn the jar upside down and place it at an angle of about 30º. (Special mesh lids for sprouting have a spout that helps the jar stand correctly.) This allows excess water to drain from the sprouts.
- Rinse the seeds with warm water 2-3 times a day.
- Keep the jar tilted at all times so water does not stagnate.
- The sprouts will be ready to eat in 3-7 days.
Growing Microgreens Without Soil Using a Sprouter
Due to the popularity of microgreens, special sprouters and automatic hydroponic sprouters are now available on the market.
Automatic systems supply sprouts with oxygen, which speeds up the process. Of course, such eco-farms can be very expensive. However, there are sprouters that are about 20 times cheaper and still simplify this very easy process even more.
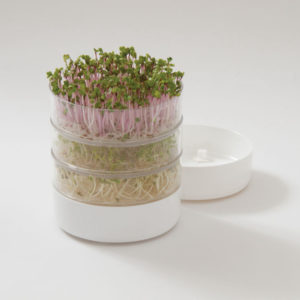
A regular sprouter consists of a water reservoir and a mesh tray where the seeds are placed.
What you need to grow microgreens in a sprouter:
- Organic, clean microgreen seeds
- A sprouter
Step-by-step instructions:
- Rinse the seeds and soak them in warm water for 2 to 12 hours to swell.
- Drain the water and rinse the seeds with clean water.
- Fill the sprouter’s tray with water up to the mesh level.
- Evenly spread the seeds over the mesh. Some sprouters have mesh trays with different hole sizes for different seed sizes. If not, use a paper towel for small seeds.
- Cover the container and move it to a warm, bright place.
- Ventilate the sprouter 1-2 times a day and add water to the tray as needed.
- The young sprouts will be ready to eat in 7–14 days depending on the crop.
- After each harvest, clean the tray from any plant roots.
Conditions for Growing Microgreens
- The optimal temperature for growing microgreens is 20–22 ºC. If the temperature drops below this, the plants will need more time to grow, while higher temperatures can cause them to rot or dry out.
- During their short growth period, microgreens usually do not get infected by diseases. However, exceptions occur. Excess moisture or poor-quality seeds can cause mold to develop. If you doubt the seed quality, pre-soak them for a day in a baking soda solution (1 g per 200 ml water) or boric acid solution (0.2 g per 1 liter water).
- After each harvest, any containers intended for reuse should be thoroughly cleaned and disinfected.
- Do not reuse mats made of linen, cotton wool, coconut substrate, etc. If you plan to reuse soil, it must be baked and disinfected with a potassium permanganate solution.
- Place microgreens in a sunny spot but avoid direct sunlight. Microgreens do not need much light; too much can dry out the plants or encourage the growth of pathogenic fungi.
- Avoid sowing too densely, as this reduces airflow and can lead to mold formation.
- It is also important to distinguish mold from normal root hairs on the sprouts. Root hairs help retain moisture and have a fuzzy, irregular structure, while mold resembles a web and feels slimy to the touch. Mold on roots also produces a characteristic smell. Mold disappears after rinsing with water, while root hairs return after a few hours. Lastly, healthy root hairs are found only on the roots, whereas mold can affect all parts of the plant.
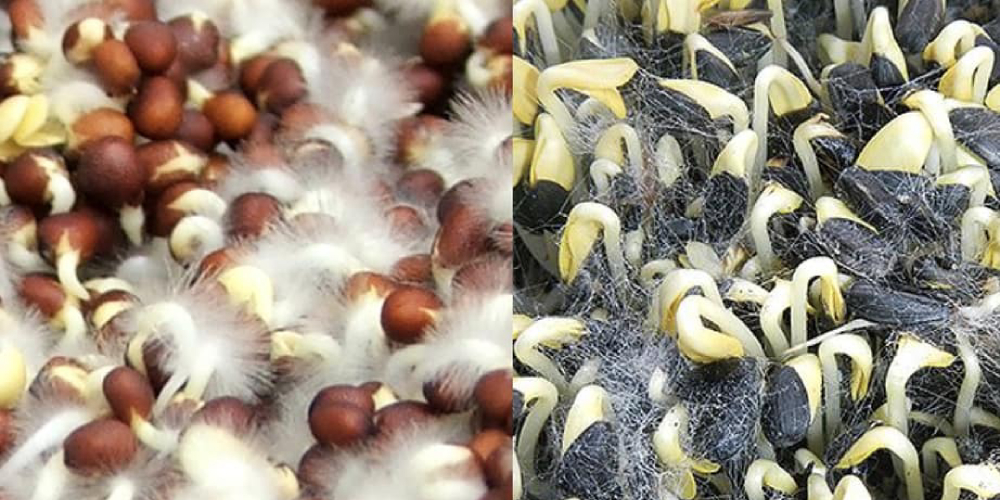
Table: Soaking, Sprouting, and Growing Times for Microgreens
| Crop | Soaking Time | Sprouting Time | Growing Time |
| Adzuki | 8 hours | 3–5 days | — |
| Amaranth | 4–6 hours | 2–3 days | 7–10 days |
| Basil | 2–4 hours | — | 5–14 days |
| Borage (cucumber herb) | 8 hours | — | 10–15 days |
| Pea | 8 hours | 2–5 days | 12 days |
| Mustard | 8–12 hours | 4 days | 5–7 days |
| Green buckwheat | 2–4 hours | 12–24 hours | — |
| Cabbage (all types) | 6–12 hours | 3–5 days | 4–7 days |
| Clover | 4–6 hours | 4–5 days | 6–7 days |
| Coriander (cilantro) | 8–12 hours | 4–6 days | 7–10 days |
| Cress | 4–6 hours | 3–5 days | 5–7 days |
| Corn | 12 hours | 2–3 days | 9–12 days |
| Flax | 5–7 hours | 3–4 days | 7–10 days |
| Onion (all types) | 4–6 hours | 2–5 days | 7–14 days |
| Alfalfa | 6–8 hours | 3–5 days | 5–7 days |
| Mizuna | 4–8 hours | — | 5–14 days |
| Nasturtium | 12 hours | 10–15 days | 14–21 days |
| Chickpea | 12 hours | 12 hours | 10–14 days |
| Sunflower | 2–8 hours | 24 hours | 10 days |
| Spelt | 6–8 hours | 1–2 days | — |
| Millet | 8 hours | 2–3 days | — |
| Milk thistle | 8–12 hours | 2 days | — |
| Radish | 6–12 hours | 3–5 days | 6–7 days |
| Arugula | 8–10 hours | — | 7–10 days |
| Beet, Swiss chard | 8–12 hours | — | 5–14 days |
| Celery | 12–24 hours | — | 14–21 days |
| Lettuce | 4–6 hours | — | 10–14 days |
| Soybean | 10–12 hours | 3–4 days | — |
| Lentil | 8–12 hours | 1–2 days | 9–12 days |
| Spinach, sorrel | 4–8 hours | — | 3–6 days |
To avoid problems when growing microgreens, simply follow these basic rules and monitor the process carefully. As a result, you’ll enjoy fresh and tasty vitamins right on your windowsill!
If you have found a spelling error, please, notify us by selecting that text and pressing Ctrl+Enter.


А вот и осенний урожай микрозелени подошел!
Промывать и проветривать надо после того, как первые всходу взойдут? Надо проветривать голые семена, только посаженные. И как часто воду менять надо?
Доброго дня! Який саме вид пророщування Ви маєте на увазі?
Добрый день, подскажите, а семена петрушки тоже 4-6 часов замачивать? Спасибо.
Добридень! Так, насіння петрушки потрібно замочувати не менше 4-6 годин та не більше 12 годин. Бажано загорнути насіння в марлю, покласти на блюдце і залити теплою водою так, щоб вона не повністю покривала насіння. За час пророщування воду потрібно міняти 3-4 рази.
Доброго дня! Не побачила в таблиці Броколі, можна по ній дані по дням росту та по замочуванню?
Другий раз намагаюсь проростити і спочатку все добре, а на 5-й починать в”янути і лягають(